 AtlasCube
Web flasher
Flash AtlasCube firmware
No tooling. Pick your display, plug in over USB, click Connect.
- Hold BOOT, plug in USBKeep holding until the browser's port picker appears. The board won't enter the bootloader on its own.
- Connect → InstallClick Connect on your display below, pick the serial port, then Install.
- Join the radio's Wi-Fi
AtlasCube-XXXXXX, password99876543, then open192.168.4.1to set Wi-Fi and pins.
Chrome, Edge, Opera or Brave only. Firefox and Safari have no WebSerial. Already running AtlasCube? Use ↓ OTA and upload it at Settings → Tools → OTA.
More about the first boot
One firmware fits any wiring: pins live in the web UI, not the build. The page at 192.168.4.1 sets up both Wi-Fi and the GPIO pin map. Later, once the device is on your own Wi-Fi, reopen it at <device-ip>/setup (the IP is shown on the splash screen at startup). After mapping pins, unplug the device and plug it back in.
Work in progress. If you hit problems after an OTA update, a full USB flash with Connect is recommended.
Not sure how to wire it? See the wiring diagrams.
20 images
Colour TFT
SPI panels with capacitive or resistive touchST7789V
320×240 SPI · 16MB flash
CST328capacitive touch
Chrome / Edge only
Needs HTTPS
↓ OTA
ST7789V
320×170 · 1.9" SPI · 16MB flashWiring notes
Default pins are the ILI9341 ones. On the Sunton ESP32-1732S019N the panel is fixed on the board: set mosi 13, clk 12, cs 10, dc 11, rst 1, led 14 at /setup after flashing (the screen stays dark until then), and move the SD card and encoder pins off them.
ST7796U
480×320 SPI · 16MB flashILI9488
480×320 SPI, 18-bit · 16MB flashAMOLED & round
High-contrast and round panelsOLED
Mono and grayscale, driven by a rotary encoder
Rotary encoderno touch
Chrome / Edge only
Needs HTTPS
↓ OTA
Rotary encoderno touch
Chrome / Edge only
Needs HTTPS
↓ OTA
Wiring notes
Same pins as the SSD1322.
SSD1306
128×64 mono OLED, I2C · 16MB flash
Rotary encoderno touch
Chrome / Edge only
Needs HTTPS
↓ OTA
Wiring notes
Four wires: VCC, GND, SCL, SDA. The two pins are set at /setup after flashing.
SH1106
128×64 · 1.3" mono OLED, I2C · 16MB flash
Rotary encoderno touch
Chrome / Edge only
Needs HTTPS
↓ OTA
Wiring notes
The 1.3" module looks like a bigger SSD1306 but has an SH1106 chip; the SSD1306 image shows it shifted with garbage at the edge. Four wires: VCC, GND, SCL, SDA. The two pins are set at /setup after flashing.
2× SSD1306
256×64 two mono OLEDs as one screen, I2C · 16MB flash
Rotary encoderno touch
Chrome / Edge only
Needs HTTPS
↓ OTA
Wiring notes
Both modules on the same four wires (VCC, GND, SCL, SDA). Re-strap one module to address 0x3D (jumper on its back) and mount it on the right; the left one stays at 0x3C. Pins are set at /setup; if the two differ in brightness, Settings → Two display brightness balance evens them out.
No display
A radio without a screenHeadless
no screen web UI, app, MQTT or rules · 16MB flash
Rotary encoderoptional
Chrome / Edge only
Needs HTTPS
↓ OTA
Wiring notes
An optional rotary encoder turns the volume; press = pause, long press = next.
ESP32-P4
Preview build v0.64.0-13-gbcee57b, not part of a release yetFireBeetle 2
800×480 · 4.3" DFRobot FireBeetle 2 ESP32-P4 · ST7701S over MIPI-DSI, Waveshare 4.3-DSI-TOUCH-A · 16MB flash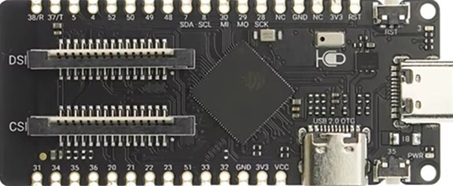
GT911capacitive touch
Chrome / Edge only
Needs HTTPS
↓ OTA
Wiring notes
For the DFRobot FireBeetle 2 ESP32-P4 with early silicon (chip revision below v3, as sold so far). It does not run on the P4 DEV-KIT, whose newer chip has its own image. Wi-Fi goes through the onboard ESP32-C6, which should run esp-hosted 2.12.6: see the ESP32-C6 card. The panel needs 5 V on a separate wire, since the ribbon carries only 3.3 V. The microSD slot on the board is used as is. ESP-NOW is not available through the C6, so the AtlasCube Controller cannot pair with this radio yet. The radio does not offer itself updates: reinstall from this page.
P4 DEV-KIT
800×480 · 4.3" Waveshare ESP32-P4-Module-DEV-KIT · ST7701S over MIPI-DSI, Waveshare 4.3-DSI-TOUCH-A · 16MB flash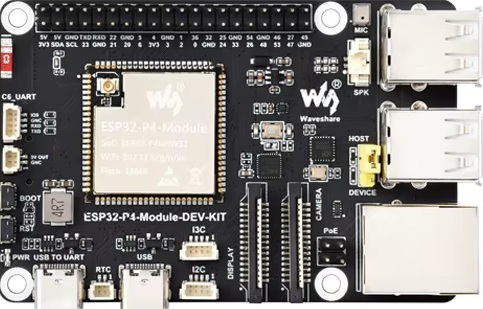
Wiring notes
For the Waveshare ESP32-P4-Module-DEV-KIT. Its P4 is newer silicon (chip revision v3.x) than the FireBeetle 2's, so it has its own image: the two are not interchangeable. No Connect button yet: the browser flasher cannot reach the flash of this chip revision until its next update. Download the .bin and flash it with esptool v5 (esptool 4.x, including the one in ESP-IDF 5.5, fails on this chip the same way): pip install "esptool>=5", then esptool --chip esp32p4 -p COMx write-flash 0x0 AtlasCube-p4dk-st7701-gt911.bin. Use the USB TO UART port: it switches the P4 into download mode by itself, so no BOOT button is needed, and the radio's log comes out on the same port. Wi-Fi goes through the onboard ESP32-C6, which should run esp-hosted 2.12.6: see the ESP32-C6 card. The panel's separate 5 V wire goes to the 5V OUT pins. The microSD slot on the board is used as is. The onboard ES8311 codec and speaker output are not used: wire a PCM5102A to BCK 46, LCK 47, DATA 48, the defaults on this board. The other defaults are the encoder on 32/33 with its button on 23, and the buzzer on 20. GPIO 28–31, 34, 35 and 49–52 carry the board's Ethernet, so /setup refuses them. ESP-NOW is not available through the C6, so the AtlasCube Controller cannot pair with this radio yet. The radio does not offer itself updates: reinstall from this page.
ESP32-C6
Wi-Fi co-processor onboard, SDIO to the P4 · 4MB flash
esp-hosted 2.12.6slave firmware · flashed over UART
Chrome / Edge only
Needs HTTPS
↓ .bin
Wiring notes
The FireBeetle's factory C6 image works, but it predates version reporting (the boot log says Co-proc [0.0.0]) and can hit RPC timeouts, so we recommend this one. It changes only the C6: the radio keeps its firmware and settings. The C6 has no USB of its own, so you need a 3.3 V USB-UART adapter. On the FireBeetle 2, use the row of three pads next to the C6: tie IO9 to GND, connect the adapter's TX to RX0 and its RX to TX0, and its GND to a GND pin. On the P4 DEV-KIT, the 4-pin C6_UART connector carries the same lines: IO9, GND, RXD, TXD. On either board, hold the P4's BOOT button while you power it, so AtlasCube does not start and reset the C6. Then click Connect and pick the adapter's port, or download the .bin and run esptool.py --chip esp32c6 write_flash 0x0 AtlasCube-C6.bin. Afterwards remove the IO9 link and power-cycle the board.
No display matches. Try the chip number only, e.g. 9341.
Web UI files (all displays). Only if the device says the web UI is out of date after an app-only update. Re-upload at Settings → Tools or
/setup.
↓ .zip
Bluetooth module on a plain ESP32. No QCC5125? A classic ESP32-WROOM running our firmware takes its place.
→ BT module